HOW TO PUT ON FENCE POSTS
We have several different styles of fence post caps, please be sure to refer to the correct information for the post caps you have purchased.
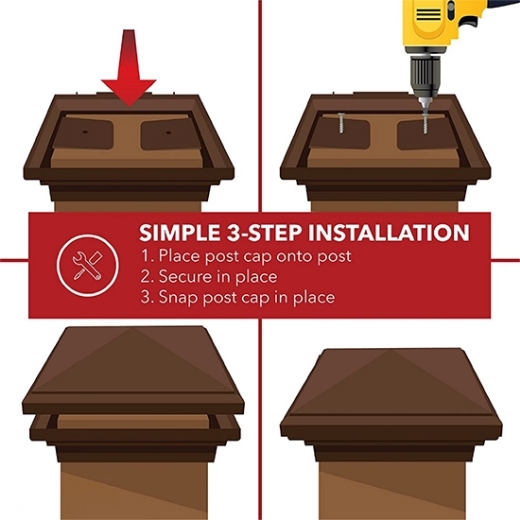
INSTALLING YOUR SNAP-CAP FENCE POST CAPS
Our patented SNAP-Cap Fence Post Cap design makes installing post caps on your fence or deck fast and easy.
STEP 1
Attach the base of the post cap to the wooden post in the proper direction. The two supports should be on the top side of the fence post cap base. The bottom of the post cap base is smaller than the top of the post cap. If the top of the post cap will not snap securely onto the base, you may have the post cap in the wrong orientation. If this is the case, look at the base of the cap and verify that the word "This Side Up" is in the proper orientation.
STEP 2
Once the post cap is on the post, attach the post cap to the wooden post via the pre-drilled holes on each of the cap supports with the included decking screws. Depending on the size of the post cap, it may come with 2 or 4 screws. If you choose to supply your own screws, we highly suggest using anti-rust screws to ensure a long-lasting, no-hassle attachment.
STEP 3
Align the top of the post cap over the secured base and press firmly until the cap "SNAPS" into place. The top of the base should be firmly secure and will withstand even the harshest of weather and wind without becoming loose.
INSTALLING YOUR METAL FENCE POST CAPS
Our metal post cap design makes installing post caps on your fence or deck fast and easy.
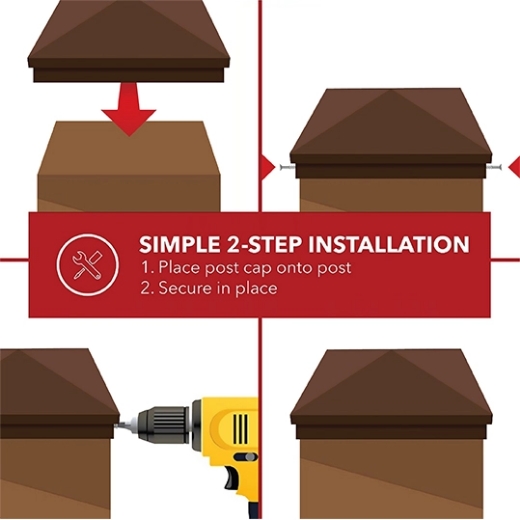
STEP 1
Place your metal post cap on your wood post. The cap should be a close fit to your post but will be firmly secured in the next step.
STEP 2
Attach the post caps to the post using the included anti-rust screws. Please note: some sizes of metal post caps may use a friction fit or slip-over style installation. Instead of screws, you may also consider using epoxy or caulking to secure the metal to the post. We recommend screws or friction fit over epoxy in case fence or deck maintenance is ever required.
INSTALLING YOUR SOLAR FENCE POST CAPS
Each solar post cap will come with instructions tailored to the specific unit. The installation method is generally identical to the metal post cap method above. One caveat is that some models will include an adapter that may need to be inserted in the base of the solar cap before installation. The adapter may scale the size of the post cap up or down to fit a different size post.
One consideration with solar caps we take every opportunity to remind our customers of is the need for a lot of direct sunlight. The solar panels on these post caps power rechargeable batteries, and without long exposure to direct sunlight, they will not work at their optimum level. If you do not have an open space that receives a lot of direct sun, consider using wired or unlit post caps.
