How To Maintain A Wood Deck
So you're looking to seal your deck but you don't know where to start? Well we're here to help you out.
A beautifully kept deck has the ability to become the eye-catching, event-hosting area of any yard. On the other hand, a neglected wooden deck can rapidly become an unused eye-sore. With the correct care, attention, and maintenance, your deck can last for decades. However, many people either don’t know how to preserve a wooden deck or neglect their duties as they see it as too time-consuming. We’re here to debunk that myth and give you all the tips and tricks you need to keep your wood deck looking and feeling like new.
The key to deck preservation is regimented cleaning and oiling or staining schedules. Sounds time-consuming – doesn’t it? Well, it isn’t! Just once or twice per year and your deck will be prepared to withstand the heat and UV of spring and summer as well as the wet, wind, and cold of fall and winter.
Deck Preparation & Cleaning
Step one of deck maintenance is cleaning off debris, dirt, and grime. There are a couple of effective ways to do this, so we’ll run through them both step-by-step and teach you how to clean a wood deck. Whichever you choose to do, we recommend doing this at least twice a year. Once at the beginning of spring and again at the end of summer.
Cleaning Chemicals
A cleaning solution is probably the fastest and easiest way to get the job done. However, they can cause some serious harm to your plants and lawn, should they come into contact. So, before you get to dousing your deck in your newly purchased deck cleaner, be sure to cover any areas you want to protect.
Step 1: Go, grab yourself a wood deck scrub brush, and get rid of loose debris such as leaves, moss, and dirt. Be sure you're heading in the direction of the grain, ensuring you don’t cause any unwanted or unnecessary damage to your precious wood.
Step 2: Apply your multi-purpose deck cleaner. We recommended doing a small test on an inconspicuous area of your deck, following the manufacturer's instructions, to make sure your chosen cleaning solution acts as you expect and causes no damage.
A handy tip is to look for a deck cleaner that eliminates mold. Long-term and excess mold build-up will cause irreparable damage to a wood deck, and it spreads fast. If you use a cleaner that doesn’t kill mold, you’re likely going to spread it around as you clean – not ideal!
Manufacturer's instructions will vary, but you’ll likely apply the cleaner directly to the surface, scrub in with a brush to enable the solution to work its magic, and lift dirt from the deck. From there, you’ll leave it to settle for around 15-20 minutes.
Step 3: Thoroughly rinse your deck with water. You can use either a hose or pressure washer, whichever you’d prefer. With a hose, you’ll have to repeat the rinsing process a few times to be 100% certain all the cleaning solution is removed. Alternatively, if you opt for the pressure washer, one go over will suffice.
Pressure Wash
If for any reason, cleaning chemicals aren’t your thing, then you can complete the job with just a pressure washer. We’ll warn you now – this could end up being a much more energy-sapping and lengthy process.
Step 1: As with cleaning chemicals, you need to start with a wire brush, removing any loose debris, making the pressure washing stage easier as you’ve got less dirt to cut through.
Step 2: Pull out the pressure washer! Before you go ruining your entire deck, do a quick test on a small hidden area to see how your wood deck reacts to the pressure level you intend on using – the last thing you want to do is cause damage to large portions of your deck.
Step 3: Once you’re certain your wood can handle the pressure, begin cleaning the rest. We’d suggest using a wide-angle nozzle and not holding it too close to the face of the deck – you might not get all the dirt off the first time around, but you’ll definitely preserve the quality of your wood. If you need to do another cleaning cycle, go back to step one, brush the deck surface again before heading out with the pressure washer for a second time.
IMPORTANT NOTE: if you’ve spotted mold on your deck, you must eliminate this before using a pressure washer. As we mentioned, spreading mold around your deck could quite literally open up a can of worms and cause more damage than if you hadn’t bothered cleaning it at all.
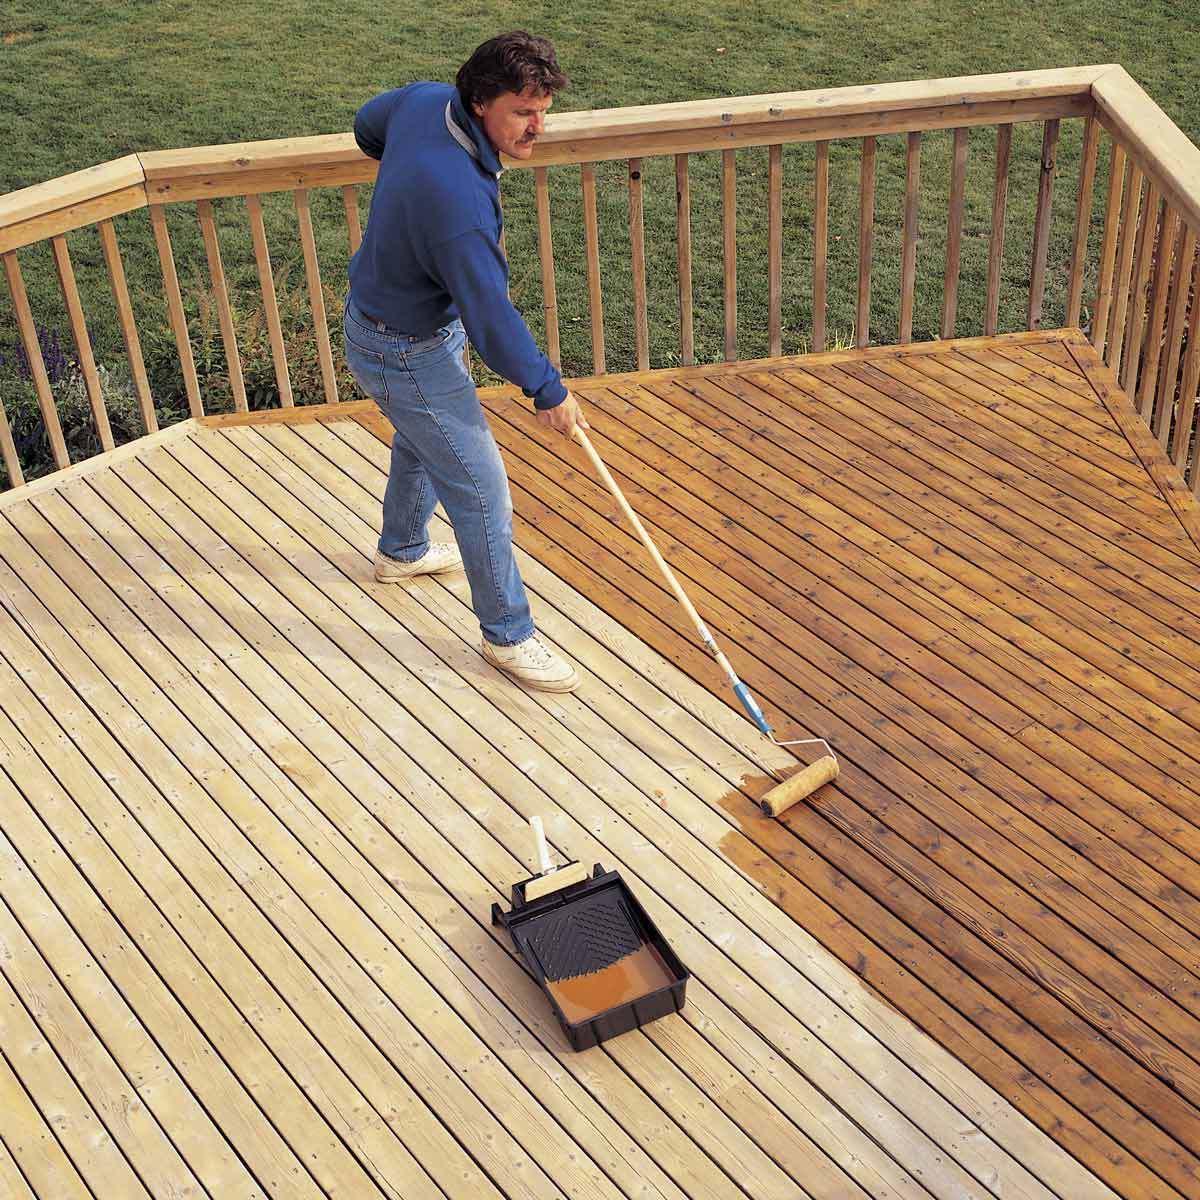
Oiling & Staining
The second stage of your project is either oiling or staining your newly cleaned deck. If anyone were to ask us how to preserve a wooden deck, oiling and staining would be top of the list. Oils and stains work slightly differently and offer a selection of appearances, but the outcome is the same – they preserve and protect your wood.
Oils
Incredibly durable and easy to maintain, decking oils soak deeply into the pores of your wood, providing intense protection from the inside out. If you’re looking for a solution that requires minimal upkeep, oils are for you. They’re usually available in natural colors that will enhance and compliment the original color of your deck.
Opting for decking oil will provide fantastic protection against rain and sunshine. Better yet, it won’t make your deck incredibly slippery when it gets wet.
On the flip side, oils can never be painted or stained over. If you ever wanted to switch up the look of your deck, you’d need to strip the oil first – which can be intensive.
Stains
Deck stains work by creating a protective and impenetrable seal around your deck. If your deck is going to be used and walked on frequently, staining will provide ideal protection. However, when it gets wet, it is going to get slippery, which is definitely a key factor to consider for an area with high foot traffic.
You’ll get equal protection against rain and sunshine with the added benefit of fending off rot and greying of the wood.
It’s important to consider that stains aren’t as durable as oils – they’ll require more touching up as peeling and flaking are much more likely. In addition, if you want to preserve the natural look of your deck, a stain isn’t the product for you. It can completely cover the wood grain, leaving you with an unnatural finish.
Post Caps
Often forgotten during deck maintenance – posts need preserving too. If you have a raised deck with railings, you’ll definitely have posts, and you’ve likely stained or oiled them at some point, but have you ever thought about the damage that can be done by leaving the top of them exposed?
As water, light, heat, and cold penetrate deep into the posts, they can crack, warp, and decay. Post caps are the perfect addition for preserving the life of your posts and enhancing the aesthetic of your deck. Available in a range of styles, designs, and materials, you’ll easily find post caps that appeal to you.
All you have to do is purchase caps that match the size of your posts, slide them into position once you’ve finished your deck maintenance, and leave them in place to keep your posts in pristine condition while making your deck look incredible. In fact, post caps are the first step in decorating your deck. Decorating Your Deck And Outdoor Space
Here at Atlanta Post Caps, protecting and uplifting the look of posts is what we do – check out our vast selection of premium post caps here: Shop Post Caps